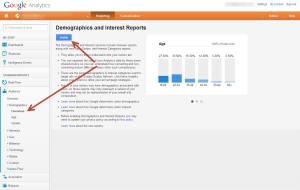
Google Analytics supports demographics and interest reports using the same demographics and interest categories used on the Google Display Network. Not all of your site’s traffic will have associated demographic or interest data, and if the associated data is small enough so that there is a chance of personal identification, Google will enforce thresholds and display a notice instead of actual data.
If the subset of your site traffic with associated demographic or interest data is large enough to justify analysis, it makes sense to enable Google Analytics to capture this information. Doing so requires updating your Google Analytics tracking code.
Most users on our network opt to use a plugin to manage the Google Analytics tracking code, and Google Analytics for WordPress by Yoast is one of the most popular.
Unfortunately, as of version 4.3.3, Google Analytics for WordPress doesn’t support adjusting the tracking code to capture demographics and interest data out of the box. The plugin developers have indicated they are working on a major plugin update to support Universal Analytics, which will support collection of demographic and interest data when it’s available. Even then, the plugin won’t support this feature for those using the classic Google Analytics tracking code. Google Universal Analytics entered public beta in March of 2013, and you can upgrade your site today to make use of it. However, if you upgrade to Universal Analytics before the plugin is updated to support it, you’ll have to find another way to add the tracking code to your site. At some point in the future Google is expected to require you to switch to Universal Analytics, and the plugin is likely to support Universal Analytics well before that point. With the passage of time, the lack of support for tracking demographic and interest data using classic Google Analytics will become a moot point.
As an interim fix, we’ve patched the Google Analytics for WordPress plugin and provide a workaround for those who want to capture demographic and interest data using classic Google Analytics. In just a few simple steps you can start capturing this information. Here’s how to do it.
- Visit the plugin’s settings menu and click the checkbox to host ga.js locally; see the screenshot below; you’ll only see this setting if you’ve already clicked the check box to Show advanced settings, so do that first if you don’t see the option to host the script locally;
- In the box for the URL, enter the URL of this link: https://stats.g.doubleclick.net/dc.js; enter it exactly as it appears, including the protocol;
- Save your plugin settings;
- Sit back and wait patiently for at least 1 hour;
- Not less that 1 hour after saving your settings, access your Google Analytics account and visit the Audience->Overview->Demographics->Overview selection on the menu; you’ll see a display similar to the screenshot at the top of this post;
- Click the Enable button;
- Click the Validate Tracking Code button to confirm you’ve completed the above steps correctly;
- Update your website’s privacy policy consistent with Google’s policy requirements for display advertising;
- Follow those updated privacy policies.
Be sure to enable access to the plugin’s advanced settings by clicking the checkbox:
With advanced settings enabled, click the checkbox to host ga.js locally and enter the URL shown:
Once you’ve saved your changes, the tracking code should validate successfully at the click of the button:
If everything worked perfectly, you’ll be congratulated for a job well done:
Google doesn’t provide specific language to include in your site’s online privacy policy, because it’s up to you to define a policy that fits your business and your local laws and to effectively communicate that to your visitors. It’s a good idea to provide links to Google’s tools for visitors to opt out of the data collection you add to your site by enabling gathering demographics and interest information.
In 24-48 hours, you should see demographic and interest data in your Google Analytics account.


