It’s easy to create custom CSS for your WordPress site on our network using the Jetpack by WordPress.com plugin. This article is focused on using Jetpack’s Custom CSS feature, so we’ll assume you’ve already activated Jetpack. If not, skip over to our article on activating Jetpack for WordPress and get that initial step resolved. With the plugin activated, you’ll be ready to create custom CSS.
Jetpack stores custom CSS in the WordPress posts table in the overall WordPress database for your site. Because we support storing post revisions, each change to your CSS that you save becomes a new revision. With a few mouse clicks, you can revert to a previous revision if your most recent changes weren’t quite right. That makes Jetpack a great way to quickly customize your site while recovering from the occasional mis-step or change-of-heart. Let’s get started.
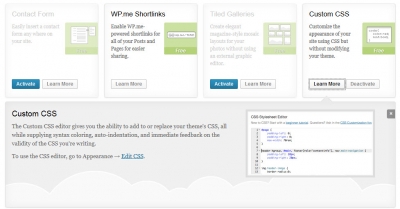
First, visit the Jetpack menu and scroll down to find the Custom CSS module. If Custom CSS is inactive, click the Activate button. You can also confirm that the module is active by clicking the Learn More button; if the module is activated, you’ll see a Configure button.
Once the Custom CSS module is activated, you’re ready to create custom CSS for your WordPress site. To record your style changes, visit Appearance->Edit CSS.
Add-on or Replace Your Current Stylesheet?
Before jumping in and adding some styling rules, consider how you want to use Custom CSS on your site.
The Custom CSS module gives you the choice of working in 1 of 2 modes:
- Add-on CSS (Recommended)
- Replace theme’s CSS (Advanced)
The Add-on CSS mode will load your custom CSS after your theme’s stylesheet, and your custom CSS will override any styling rules set by your theme. Using this mode, you only need to record the styling elements you want to change. Since our professional themes already include polished stylesheets, you can keep your focus on customizing your site instead of building it from scratch.
If you really don’t like the stylesheet that comes with your theme and want to start fresh, Jetpack gives you that option with the Replace theme’s CSS mode. Using this mode, your theme’s stylesheet won’t be loaded at all, and your custom CSS will become your entire styling. This is only for advanced users who have prepared a complete stylesheet.
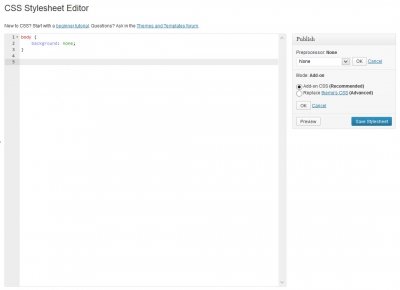
These settings can be reached by clicking the Edit link for the Mode in the Publish metabox. It’s shown in the screenshot below.
Create Some Styling Rules
We’ll assume that the Add-on CSS mode suits your custom CSS needs because that means less typing for you (and us…) into the CSS Stylesheet Editor. If you opt to use the Replace theme’s CSS mode, you can either type your CSS directly into the editor or paste it from another source. Your choice of mode doesn’t change what you do, only the amount of styling rules you have to get into the editor.
The CSS Stylesheet Editor is shown below. It includes helpful features such as line numbers, syntax coloring, auto-indentation, and immediate feedback on validity where a red “X” will appear to the left of the line number where invalid syntax is detected.
The custom CSS recorded in our sample resets the background for the body to none. This would override a setting in a theme that set a background for the body to an image. If that were the only CSS change we needed to make and were otherwise happy with the theme’s stylesheet, we’d be done creating style rules.
Your CSS needs may require you to include URL’s to content, such as images, that you’ve uploaded to your site. We recommend you use absolute URL’s that include your top level domain, sometimes referred to as your mapped domain, to point to content on your site.
For your work, after each change click the Save Stylesheet button.
Reverting To Previously Saved Custom CSS
Since Jetpack stores custom CSS in the WordPress posts table and we support tracking post revisions, you can revert to a previously saved version of your custom CSS.
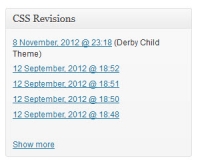
To see the content of a previous revision, click the date-labeled link in the CSS Revisions metabox. Don’t worry – viewing the content of a revision won’t restore it at this point. You’ll have the ability to compare the revision to a newer version and to decide whether to restore it once you’ve examined it.
After examination, if you want to restore that revision, click the Restore link; otherwise, go back to return to the CSS Stylesheet Editor.
Stylesheet Preprocessors for Advanced Users
Jetpack supports 2 stylesheet preprocessors, LESS and Sass (SCSS Syntax). Preprocessors make it easier to manage your site’s styling rules by giving you access to features such as variables and nested rules.
Variables in CSS allow you to set a variable name to a color in 1 place, and then use that variable name throughout your stylesheet. That turns changing the color into an edit to 1 line where the variable is defined instead of edits to every line where the color is applied. Nesting CSS rules makes styling less repetitive and potentially easy to understand.
For more info on preprocessors, see Using the LESS CSS Preprocessor for Smarter Style Sheets or Getting Started with Sass.
Most users should keep the default Preprocessor setting of None.
Conclusion
Using Jetpack on your wpPERFORM.com site is a great way to create custom CSS and produce a unique web presence. It’s efficient because you have the ability to build from an existing stylesheet in a premium theme rather than starting from scratch. It’s safe and reliable because you get immediate feedback on the validity of your CSS changes and can revert to previously saved custom CSS if your needs or tastes change. At the same time, Jetpack is powerful enough to let you completely start over with a fresh stylesheet and make use of advanced CSS preprocessors if your needs require those features.


