Already understand domain mapping? Jump ahead using one of these quick links:
Use the WWW prefix?
Do you own domain variations based on other TLD’s?
Update your DNS record
Stop Everything! My Primary Domain Doesn’t Use WWW
Use Cloudflare To Manage Your DNS Zone
Wait for propagatiom
We’re happy to map your primary domain to your wpPERFORM.com site at no charge for PERFORMplus and up. Here’s an outline of how that’s accomplished along with the information we need. If you’re familiar with domain mapping and have communicated your primary domain to us and only need the information to update your DNS, scroll down to the bottom of this article.
Your site on wpPERFORM.com is a subdomain on our network, but you may own your own domain name that you purchased at a domain registrar. In fact, you may own several domain names that are part of different top level domains (TLD), such as .com or .org. You might opt to use 1 TLD variation as your primary domain and redirect other variations to that primary domain. Alternately, you may own but elect to not redirect a TLD variation of your primary domain so that others can’t attempt to confuse visitors that they have mistakenly found your site.
In other situations, you might want to change your domain name completely because you’ve changed the name of your business. You own the domain name based on your old business identify and have just purchased the domain name you want to use going forward. You now want to redirect all traffic from the old domain name to the new one.
Our domain mapping covers all of these needs.
Use the WWW Prefix?
Domain names can be prefixed with one or more hostnames, which are sometimes called subdomains. The most common hostname is www, and this causes some to incorrectly conclude that the www is part of the domain name. It’s not.
For domain mapping, we need to know the uniform resource locator (URL) you want visitors to use to reach your site. We’ll call this your primary domain, but it really consists of several things: the hostname + your domain name + the TLD of your domain name. For these purposes, we’re ignoring the protocol (i. e., the HTTP or HTTPS).
Your primary domain is the one you should consistently use when linking to and promoting your site in marketing materials. Sites that include the www prefix actually point to a specific hostname or subdomain. When you specify your primary domain, you may opt to use the domain name with or without the www subdomain. There are proponents of both options. For more information on skipping the www subdomain, check out http://no-www.org/.
On wpPERFORM.com, we’ve opted not to use the www subdomain for technical reasons. If you have an existing site, you should probably stick with your current primary domain choice. If you have an existing site and you’re not sure which one you’re using, try reaching your site with and without the www subdomain. One should redirect to the other, and that’s your primary domain.
Do You Own Domain Variations Based On Other TLD’s?
Next, you’ll need to tell us all of the domains you want mapped to your primary domain. By default, we’ll make 1 domain mapping in addition to what you specify at no extra charge, even if you forget to tell us to do it. As a secondary domain, we’ll map your domain name at the same TLD using either a hostname of www or no hostname, and we’ll choose whichever one you did not choose as your primary domain. That’s a technical way of saying that if you opted to use the www subdomain as your primary domain, we’ll map the non-www version of the same TLD to your primary domain and vice versa. That way, whether visitors use the www or not, they’ll be directed to your primary domain.
There are many flavors of TLD’s, and you may own your domain name under other TLD’s that you’d like to map to your primary domain. For example, you may own a domain name with .com and .net extensions, and you’d like both to resolve to the same primary domain. We’ll map the additional domains you specify to your primary domain, but additional charges apply beyond the first domain mapping.
Any secondary domain that is mapped to your primary domain is done so with a 301 redirect. This is the preferred message for indicating to search engines and other servers that the primary domain is the permanent location of your site.
Update Your DNS Records
For every domain you want to map, you’ll need to update your DNS records with 1 or 2 CNAME records that point to our servers. One CNAME record will apply to the www subdomain and one will apply to the bare domain, the domain without the www subdomain.
If your domain is currently hosted elsewhere and you’re moving the domain to host it with us, you’ll also need to delete all CNAME and A records that point your domain to the current servers that you are abandoning. But be careful – your DNS zone might have other CNAME and A records for functions other than pointing to a server for a website, and you should not modify those records.
To do this, simply visit your domain registrar and edit the DNS zone file for the domain you want to host with us.
Let’s cover the CNAME for the www subdomain first. This CNAME record should consist of:
- a host name, normally simply
www; - a value for the host name, simply
wpperform.comwhich is our domain name; - a Time To Live (TTL) in seconds; short TTL values allow DNS changes to spread more quickly across the internet.
Not all registrars support setting TTL on a per record basis. For example, enom.com doesn’t support editing TTL values.
Now on to the bare domain, or the domain without the www subdomain. For registrars that support setting a CNAME on the bare domain, repeat the steps above. The host name for the bare domain might be indicated by simply an @, but registrar name.com accepts a blank value to indicate the host name of the bare domain, which it then automatically converts and displays as the bare domain itself.
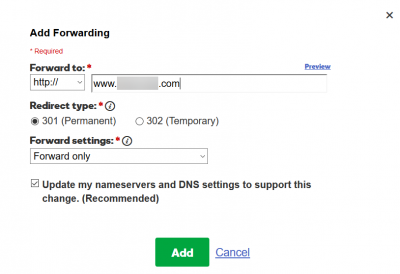
Some registrars, such as GoDaddy, do not allow adding a CNAME record to the bare domain. If your registrar doesn’t allow adding a CNAME record to the bare domain and your primary domain will use the www subdomain and your site doesn’t use the secure HTTPS protocol, there’s a quick – but probably only short-term – fix. In this situation, at your domain’s registrar, forward the bare domain to the www subdomain using a 301 redirect. The screenshot below shows how to set up domain forwarding for the bare domain to the www subdomain on GoDaddy. Nearly all registrars support domain forwarding in a similar manner.
However, while domain forwarding does work for insecure sites, we don’t consider it more than a short-term solution. Even if your site isn’t secure now, you’ll probably have good reason to secure it in the very near future. Domain forwarding doesn’t work over HTTPS in most cases. If your registrar doesn’t allow adding a CNAME record to the bare domain, you’ll soon find yourself having to separate your DNS information from your domain registration.
If you plan to use a hostname for your site that is not www (such as blog, as in blog.mydomain.com), you’ll need to create a CNAME record for that hostname instead of the www subdomain. For example, if you plan to host blog.mydomain.com with us while your main site on the www subdomain is hosted elsewhere, you add a CNAME for the blog subdomain pointing to our servers and leave the www subdomain unchanged.
Stop Everything! My Primary Domain Doesn’t Use WWW
Since some registrars don’t allow adding a CNAME record to the bare domain, domain forwarding isn’t a viable method to point your domain to our servers if your primary domain doesn’t use the www subdomain or if you plan to make your site secure.
But there’s an easy solution: separate your DNS zone from your domain registrar by using the name servers of another DNS provider, such as Cloudflare.
Use Cloudflare To Manage Your DNS Zone
There are strong reasons to use Cloudflare or another DNS manager with similar capabilities, such as AWS Route 53, to manage the DNS for your domains. Together, Cloudflare and AWS Route 53 account for over 65% of the domains with managed DNS. In comparison, GoDaddy, one of the largest registrars, accounts for about 6%.
Cloudflare runs one of the largest authoritative DNS networks in the world, powering over 35% of all managed DNS domains across the internet. It consistently ranks as the fastest global DNS provider, with about a 12 millisecond (ms) average DNS lookup time and a 30 second worldwide DNS record propagation time.
Cloudflare supports Anycast, which has big benefits when it comes to speed, resiliency, and attack mitigation. Cloudflare supports RFC-compliant CNAME flattening at the root, so it allows you to point your root domain to our servers using a CNAME record. If you have multiple domains spread across several registrars, Cloudflare allows you to centralize DNS management for all of them in one place.
The DNS capabilities of Cloudflare are probably a lot better than those of your domain registrar. Compared to the DNS of a typical registrar, Cloudflare’s DNS is faster, less susceptible to failure and attack, and makes DNS management easier. Best of all, Cloudflare has a free plan that provides access to its advanced DNS system. The combination of better features at no cost should cause just about every user to take a serious look at Cloudflare.
You can compare the DNS performance of your current registrar using Dyn.com’s free DNS tester. Dyn is another managed DNS provider, but Dyn’s pricing is much higher than AWS Route 53 and unlike Cloudflare, it doesn’t offer a free plan. To compare your registrar to a Cloudflare’s DNS, feel free to obtain a report on one of our test domains, wp-optimized.com.
Cloudflare offers a range of services, some of which are only available on its premium plans. Here, we’re focused on using Cloudflare for DNS only under its free plan.
Getting Started With Cloudflare
To get started with Cloudflare, sign up for a new Cloudflare account. If you have an existing Cloudflare account, you can add a new domain to that account by logging in and clicking the “+ Add Site” link in the top menu bar.
Creating a new Cloudflare account or adding a new domain to an existing account is a straightforward 4 step process:
- Tell Cloudflare the domain you want to add
- Let Cloudflare automatically scan that domain’s DNS records for your confirmation
- Choosing your Cloudflare plan, one of which is the free plan
- Updating the nameservers for that domain at your domain registrar
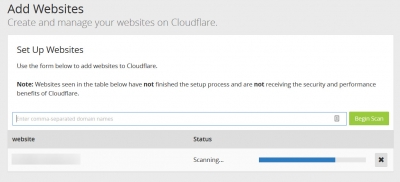
When you add a domain to Cloudflare’s DNS, it will automatically scan your domain’s current DNS zone records and copy them to its system. The screenshot below shows an in-progress scan.
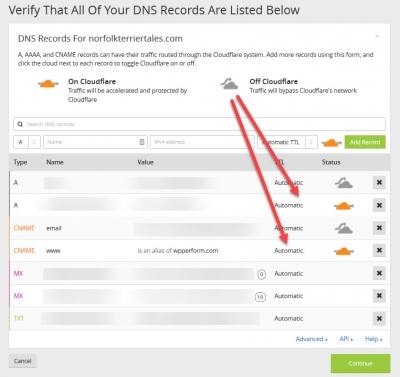
Once the scan is complete, click the Continue Setup button. You’ll see the DNS records that Cloudflare scanned for your domain, similar to the screenshot below. These are the current DNS records for your domain. In a later step, we’ll return to make changes to them.
Cloudflare offers a range of services, including hosting DNS and acting as a CDN. As the above screenshot illustrates, when the Cloudflare cloud is gray, that record is only using Cloudflare for DNS information; when it’s orange, that record routes regular site traffic through Cloudflare in addition to DNS lookups. The arrow in the image helps to remind you of those settings. When the cloud is orange, the arrow goes through the Cloudflare cloud; when it’s gray, it bypasses the Cloudflare cloud by going above or around it.
Since our focus is using Cloudflare for DNS only, in this article we won’t explore beyond setting the Cloudflare cloud to a gray color. By default Cloudflare sets certain A and CNAME records to an orange cloud (i. e., use the record for both DNS and CDN functions). Therefore, we recommend you click the Cloudflare cloud icon on each record until it turns gray and is being used for DNS only.
Cloudflare’s site provides a lot of interesting reading on its CDN performance or a comparison of its plans.
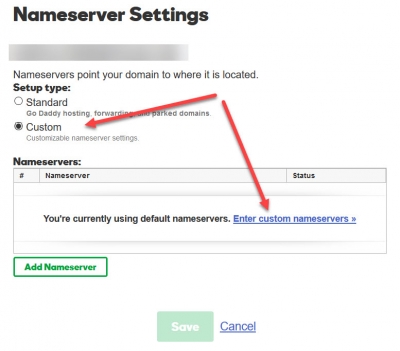
Once you’ve adjusted your Cloudflare cloud icons to gray and verified the rest of your DNS records, click Continue to proceed to choosing a Cloudflare plan. After selecting a plan, Cloudflare will provide you 2 custom name servers for that domain. Don’t worry if you forget them; you can always retrieve them from your Cloudflare dashboard. At your domain registrar, you need to switch from using your registrar’s name servers to using the servers provided to you by Cloudflare. Below is the screenshot for adding custom name servers on GoDaddy.
The process of using Cloudflare for DNS isn’t complete until you finish this step and Cloudflare confirms it. Once you’ve replaced the name servers at your domain registrar with the custom name servers provided by Cloudflare, you need to return to Cloudflare to update the DNS records it originally scanned for your domain to point your website to our servers.
First, if your site is already hosted on another server, you’ll need to identify any A or CNAME records that specify where your website is currently hosted and remove them.
Next, you’ll need to add 2 CNAME records. One CNAME record will apply to the www subdomain and one will apply to the bare domain, the domain without the www subdomain. Once you’re logged into your Cloudflare account, you’ll see a menu system similar to the one below:
Starting from this menu, here are the steps to add each record:
- Choose the site you want to modify on the left side of the topmost Cloudflare menu
- Click the DNS button (3rd from the left) to manage that site’s DNS records
- Choose CNAME from the dropdown
- In the Name field, enter
@for the bare domain orwwwfor the www subdomain - In the IPv4 Address field, enter
wpperform.comto specify where that domain/subdomain points - Choose a TTL value from the dropdown; in most cases, Automatic TTL is the best choice, resulting in a TTL of 5 minutes or 300 seconds
- Click the orange cloud until it turns gray to turn off routing your site traffic through Cloudflare’s network
The screenshot below shows adding the CNAME record for the bare domain:
Once you’ve added the CNAME record for the bare domain, repeat the process for the www subdomain.
Here’s a recap of setting up Cloudflare:
- Sign up for Cloudflare or add a new domain to an existing account
- Get Cloudflare’s custom name servers for your domain and copy them to a safe place
- Let Cloudflare scan the current DNS zone for the domain you are adding to Cloudflare
- Change your domain’s name servers to those provided by Cloudflare
- Update your DNS records on Cloudflare
- For sites currently hosted elsewhere, remove all A and CNAME records pointing to your current server
- Add a CNAME record for your bare domain pointing to wpperform.com
- Add a CNAME record for the www subdomain of your domain to wpperform.com
- When you’re done, consider exporting your current DNS configuration (see the Advanced menu at the bottom of your DNS records)
If you’re unsure of how to set up your Cloudflare DNS records to host your wpPERFORM site, make a screenshot of your DNS zone and open a support ticket.
Wait for Propagation
You should make DNS changes shortly after you’ve supplied us with the domains you’d like to map, and you should plan them so as to minimize the impact of DNS changes on your business and your site’s visitors. Your change won’t have an immediate impact because of propagation delay, which is the amount of time for name servers around the internet to be updated with new information on where your site is located. Within the United States, that delay is usually a few hours, but it can vary based on a number of factors.
Once your updated DNS information has reached the name server used by a visitor’s internet connection, your site will be reachable by that visitor at your primary domain. Not all visitors will benefit from the updated DNS information at the same time. You may find that a visitor in one area can access your site at its primary domain while another visitor in a different part of the same country with a different internet service provider cannot access it, because there are many name servers updated independently. The passage of time quickly resolves these differences.
To get started mapping one or more of your domains to your wpPERFORM subdomain, just open a support ticket.


